A quick brief of how to use our mockups.
Here you can also see what you can do with them!
Remember! Smarty Mock-ups are prepared so as to make using them a real pleasure!
Once you open a PSD file with our mockup, you will see that all project layers have proper colors assigned, they are properly named and ordered. The mockup files may differ from one another, but in order to make using them easier, we have adopted a common terminology and methodology of use.

Usually, each of our mockup consists of few main groups. Those groups represents main part of the package. Like „bottle”, „cap”, „spray” and so on.

The most important layer are those with „– customize” word and „Label” or „Project”. In those groups you can customize mockup in any way you want. You may set colors, highlights strenght and paste your own projects.
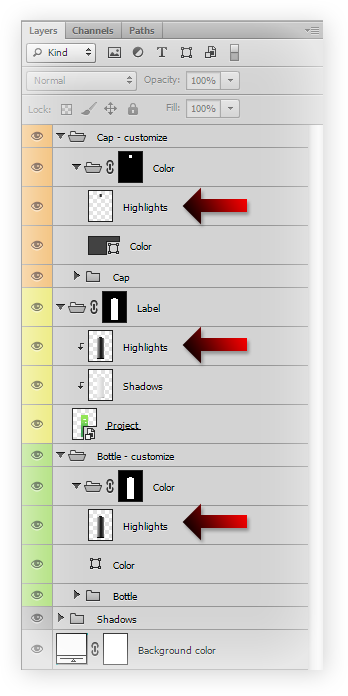
In each of main groups you will find two (sometimes more) sub-groups. The one with the rendered element (like “cap” or “bottle”) and top group named color. Above color there is Highlights layer.

By controlling the Opacity of the Highlights layer, we can determine the light intensity and the photorealism of the object. Usually, the opacity of Highlight layer should be slightly higher in the case of dark colors than for brighter packaging.
Note. It may be good idea to adjust the contrast and brightness of the Highlights layer with the use of Levels.

In the same group where highlights layer is, you can find the layer with color information. By clicking it, you can easily and quickly change the color of your packaging.

In every mockup that is made by us, you can separately change the color of the bottle, cap, closure and even the liquid inside it.

In order to paste your project, you need to find the Smart Object layer, which contains the project. It may be located in „Label” group, „Project” or similar.
You have to toggle this group and enter into Smart Object layer that contains project. From this place you can either paste or even design your own packaging project.
Sometimes in Label or Project group you will find two sub-groups. With paper label and metallic one. Thanks to this you will be able to paste project for regular paper and use metallic coating like hot or cold stamping effect.

Every element in our every mockup is build on two foundations: shadow and highlight layers.
By controlling these two layers you will be able to achieve any look you want. And what’s most important you will be able to customize our mockups in a way that we didn’t predict (and let’s face it, we can’t predict everything).

Let’s say, that you think that the bottle on the left has too strong highlights. In this case you just need to reduce Highlihghts layer in both Label and Bottle groups. And increase brightness of shadows layer. You can do it using Level, Curves or even Birghtness/Contrast function.
It may look a little confusing at the beginning, but as you will start using our mockups it will make sense in few moments.
The last layers that we need to discuss are the Shadows and Background Color group. The Shadows group contains layers responsible for adding shadow under an object – depending on your needs, you can switch them off or decrease/increase the intensity.
The last layer, Background Color, allows you to change or switch off the background color, as needed. Deafult it is set to light gray color (#f6f6f6), so you may want to set it to pure white, or any other color.